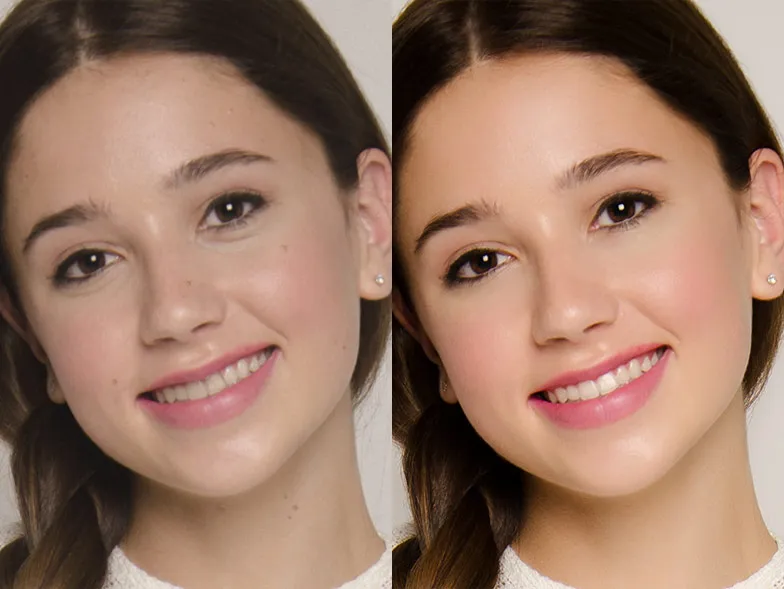
Why Use a Teeth Whitening Photo Editor Online
In today’s digital age, visual presentation is key, and a bright, confident smile can make a significant impact. That’s where a teeth whitening photo editor online comes in handy. These tools allow you to enhance your smile in photos quickly and easily, without the need for expensive dental procedures. Whether you’re sharing a selfie on social media, updating your professional headshot, or simply want to improve the look of your pictures, an online editor provides a convenient solution. They offer a cost-effective way to achieve a brighter smile, helping you boost your self-esteem and create a more positive impression. The best part is that you can achieve these results from the comfort of your home, using readily available online resources. This guide will walk you through the best tips and tricks for using these tools effectively, ensuring you achieve natural-looking and stunning results every time. The power to transform your smile is now at your fingertips!
How Photo Editors Work
Understanding how photo editors work is crucial to achieving the best results with teeth whitening. At their core, these editors utilize a range of image manipulation techniques designed to alter the color and appearance of specific areas within a photograph. The primary function involves adjusting the color balance of the teeth, often by reducing yellow or brown hues and enhancing the brightness. Most editors use selection tools, allowing you to isolate the teeth from the rest of the image. This is typically done manually, by outlining the teeth, or through automated tools that detect and select them. Once the teeth are selected, you can then apply various adjustments such as color correction, brightness and contrast adjustments, and, specifically, the teeth whitening effect. Advanced editors may also offer features like smoothing to eliminate imperfections, and even reshaping tools for a more perfect smile. The effectiveness of these tools depends on the algorithm and the user’s skills, but with practice, achieving natural-looking enhancements is entirely possible. The process involves digital manipulation to create a flawless visual outcome.
Teeth Whitening Photo Editor Basics

Getting started with a teeth whitening photo editor involves mastering a few fundamental techniques. First, you’ll want to familiarize yourself with the selection tools. Precise selection is paramount, as it ensures that the whitening effect is applied only to the teeth, avoiding any unwanted changes to the surrounding skin or gums. Next, explore the color adjustment features. Most editors provide sliders or color palettes to modify the hue, saturation, and brightness. For teeth whitening, you’ll typically decrease the yellow saturation and increase the brightness. Start with subtle adjustments to avoid an artificial look. A little goes a long way. Consider also using the contrast adjustment to make the teeth appear more defined. Finally, many editors offer smoothing tools, which can reduce the appearance of imperfections. Experiment with these tools to find the right balance. Remember that practice makes perfect; the more you use these tools, the better you’ll become at achieving natural-looking results.
Choosing the Right Editor
Selecting the right teeth whitening photo editor online is vital for achieving your desired results. There are many options available, so it’s important to consider features, ease of use, and cost. Look for editors that offer precise selection tools, allowing you to accurately isolate the teeth. Color adjustment features, such as hue, saturation, and brightness controls, are essential for effective whitening. Smoothing and retouching tools can help eliminate imperfections and create a more polished look. Consider the user interface; a clean, intuitive design will make the editing process more enjoyable. Many online editors offer free trials or basic versions, so you can test them out before committing to a paid subscription. Read reviews and see examples of edited photos to gauge the quality of the results. Some popular options include Fotor, BeFunky, and Pixlr, each with different strengths and weaknesses. By evaluating these factors, you can choose an editor that best suits your needs and helps you achieve the perfect smile.
Popular Photo Editors for Teeth Whitening
Several online photo editors stand out for their teeth whitening capabilities. Fotor is known for its user-friendly interface and comprehensive editing tools, including a dedicated teeth whitening feature that automatically detects and enhances teeth. BeFunky offers a wide range of photo editing tools, including a teeth whitening option that allows you to manually adjust the color and brightness. Pixlr, a web-based editor, provides a more advanced set of features, including layer-based editing and various adjustment options. Canva, primarily known for graphic design, also offers basic photo editing tools with a teeth whitening feature, making it a convenient option for quick edits. When selecting, consider the platform’s ease of use and the level of control it offers. Experimenting with a few different editors can help you determine which one best suits your preferences and skill level. Remember to check reviews and tutorials for each editor to learn how to make the most of its teeth whitening tools. The right choice will depend on your personal needs and desired results.
Advanced Editing Techniques

Once you’ve mastered the basics, explore advanced editing techniques to refine your teeth whitening results. One effective method is to use layer masks to apply the whitening effect selectively. This allows you to make precise adjustments to specific areas of the teeth, avoiding an unnatural overall look. Experiment with different blending modes, such as ‘Overlay’ or ‘Soft Light,’ to subtly integrate the whitening effect with the original image. Consider using a curves adjustment layer to fine-tune the brightness and contrast, creating a more natural appearance. Another technique is to adjust the color temperature of the image. Warmer tones can make the teeth appear less yellow. In addition, pay attention to the gums; whitening the teeth too much can make the gums appear redder, so make sure to maintain a balance. Finally, practice and patience are key. The more you experiment with these advanced techniques, the better you’ll become at creating realistic and stunning results. Perfecting the art of teeth whitening requires a refined understanding of the tools and a keen eye for detail.
Avoiding Common Pitfalls
Several common pitfalls can compromise the quality of your teeth whitening edits. One mistake is over-whitening, which can lead to an unnatural, artificial appearance. Start with subtle adjustments and gradually increase the intensity until you achieve the desired result. Another issue is uneven whitening; ensure that the whitening effect is applied uniformly across all the teeth to avoid an inconsistent look. Be mindful of the surrounding areas, such as the gums and skin, and avoid any color changes that could make the edit obvious. Another common mistake is neglecting the overall color balance of the image. Over-whitened teeth can appear out of place if the rest of the image is warm-toned, so make sure to adjust the color temperature accordingly. Always remember to use realistic settings to achieve a natural finish. Finally, always review your work closely to catch any imperfections and make necessary adjustments. Avoiding these pitfalls will help you create stunning, natural-looking results that enhance your smile without looking fake or overdone.
Finalizing and Sharing Your Edited Photo
After perfecting your teeth whitening edits, the final steps involve finalizing the image and sharing it with others. Once you are satisfied with the adjustments, review the entire image one last time to ensure that everything looks natural and balanced. Consider the overall composition and whether any additional adjustments are needed to improve the image’s visual appeal. Before sharing, it’s important to export the image in a suitable format. If you intend to share it online, use a format such as JPEG, which is widely compatible. Save the image at a high resolution to maintain its quality. When sharing your edited photo on social media, consider using relevant hashtags to increase its visibility. Platforms such as Instagram, Facebook, and Twitter are great places to share your photos. Remember to be mindful of the context in which you’re sharing your image. Ensure that the edited image represents a true and realistic portrayal of yourself. Whether you are sharing with friends, family, or the world, your final touch is the polish and the confident showcase of your beautiful smile.